Your car's battery is the heart of its electrical system, providing the necessary power to start your engine and run various components. However, over time, battery corrosion can occur, potentially affecting your vehicle's performance. We'll guide you through the steps to take when you notice battery corrosion, ensuring your battery remains reliable and your car runs smoothly.
Identifying Battery Corrosion
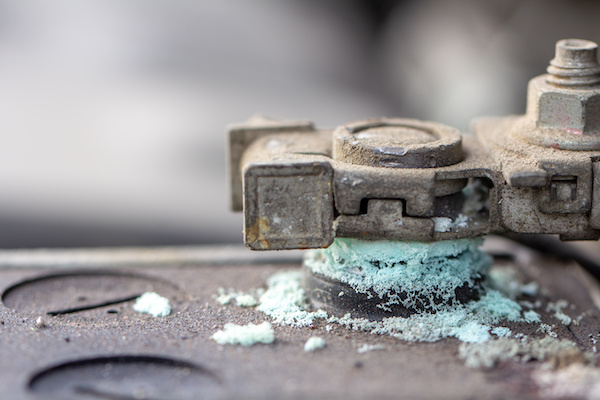
Battery corrosion typically appears as a white, greenish, or bluish powdery substance around the battery terminals. It can interfere with the flow of electricity and cause various electrical issues in your vehicle.
Step 1: Safety First
Before you start, ensure your safety. Put on safety glasses and gloves to protect your eyes and skin from contact with the corrosive material.
Step 2: Disconnect the Battery
To safely clean the battery and terminals, you must first disconnect it. Start by turning off your vehicle's engine and removing the ignition key. Then, using a wrench or pliers, loosen and disconnect the negative (black) terminal first, followed by the positive (red) terminal.
Step 3: Clean the Battery Terminals
To remove the corrosion, you can create a cleaning solution using baking soda and water. Mix a tablespoon of baking soda with a cup of water to create a paste. Dip an old toothbrush or battery terminal brush into the mixture and scrub the corroded areas gently. You may need to repeat this process until the corrosion is gone.
Step 4: Rinse and Dry
After cleaning, rinse the battery and terminals with clean water to remove any remaining baking soda residue. Ensure that everything is thoroughly dry before moving on.
Step 5: Apply Battery Terminal Grease
To prevent future corrosion, apply a thin layer of battery terminal grease or petroleum jelly to the cleaned terminals. This will create a protective barrier that inhibits corrosion.
Step 6: Reconnect the Battery
Now that the battery and terminals are clean and dry, reconnect the positive terminal first, followed by the negative terminal. Ensure they are securely fastened but not over-tightened.
Step 7: Test Your Vehicle
Once the battery is reconnected, start your vehicle to confirm that it starts smoothly and that all electrical components are functioning correctly.
Preventing Future Corrosion
To prevent battery corrosion in the future, consider the following tips:
- Regular Inspection: Periodically check your battery terminals for signs of corrosion.
- Keep It Clean: Clean your battery and terminals as needed, especially if you live in a humid or corrosive environment.
- Protective Sprays: Apply a battery terminal protector spray, available at auto parts stores, for additional corrosion prevention.
By following these steps and practicing good battery maintenance, you can ensure that your vehicle's battery remains in top condition, providing reliable power to start your engine and run all your electrical systems. A little preventive care can go a long way in ensuring your vehicle's reliability and keeping you on the road with confidence. Furthermore, if you need additional battery assistance, please call or visit Hagin's Auto in Martinez, CA, as soon as you can.